Introduction
Why is website performance important?
Speed is now used as a ranking factor for mobile searches
– Google
Why does Google want to rank fast websites higher? That is because a Google study indicates that 53% of users abandon a webpage if it doesn’t load after just three seconds. Your website load time has a tremendous effect on how long visitors will wait for your site to load. Also a half a second delay increases user frustration by 26%, ultimately, affects your conversion as well as Google’s ad revenue. So it is imperative to take your website performance seriously.

Core web vitals are the measurable performance metrics of a web page that reflects the real-world user experience. The current set of metrics that make up Core Web Vitals are Largest Contentful Paint, First Input Delay, and Cumulative Layout Shift. Web Vitals article linked above gives a detailed explanation of these metrics. The summary is shown in the below diagram.
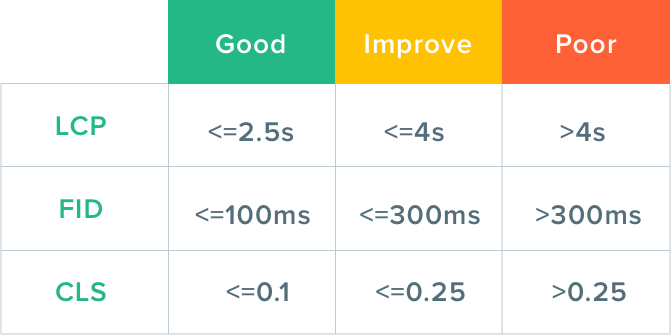
The important thing to note here is that the lower the number, the better is the result. In simple words, lesser the time, better the user experience, and hence better search engine rankings.
So, whether your intention is to improve the user experience or to optimize SEO, there’s really no reason NOT to increase your site’s performance.
That said, let’s see how we can check these metrics.
Tools to measure page performance
There are numerous tools to measure page speed. a quick Google search will list hundreds of them. A few popular ones are listed below.

Chrome’s Inbuilt testing tool: Lighthouse
Lighthouse is one of the best tools for measuring page performance. In fact, many of the major online performance testing websites internally use the Lighthouse tool to measure and show you the results in different formats. The best part about Lighthouse is that you can even measure the speed of a webpage in your local environment using Chrome. You can also integrate lighthouse in your CI tool using the npm package.
Let us also check a few online tools:
PageSpeed Insights by Google
Page speed insights is Google’s implementation of the Lighthouse tool for lab report combined with a real-world user Experience report.
GTMetrix
GTMetrix provides a very detailed report of your webpage performance. It analyses the PageSpeed combined with YSlow metrics and assigns a grade from A to F.
KeyCDN Speed test
KeyCDN Speed testing tool is a responsive, lightweight speed testing tool. If you like a simple, nice-looking report this one is for you. No overwhelming details, just the areas of improvement to focus.
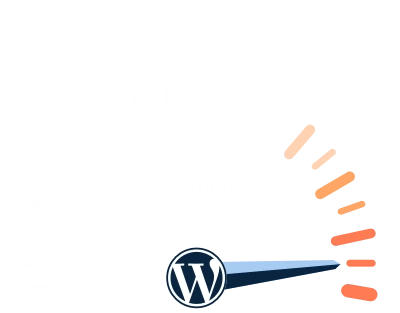
WordPress performance Importance
WordPress is the most used Content Management System in the world. WordPress now powers over 1/3rd of the top 10 million sites on the web according to W3Techs. This popularity is because of its ease of use, plugin system, easy theming, and great flexibility for developers via the concept of hooks. This allows even beginner-level programmers to write themes and plugins, which in turn made the WordPress ecosystem so huge that it is today.
Now, that is part of the problem as well. There are thousands of plugins and themes which are not well optimized for performance. It is extremely difficult to choose the best ones.
For example, let’s say if you are creating an E-commerce store, chances are that you install WooCommerce and do all the setup. What you may not notice is that Woocommerce simply loads tens of scripts and styles in all the pages of your website including the homepage. Now your homepage may or may not need all those scripts to be loaded. But without much control, your homepage ends up being much slower than it actually should.
That is just one example. There are numerous other factors that affect your WordPress website performance like unoptimized plugins, poorly written themes, uncompressed images, and so on…
Fortunately, there are different techniques to tackle this problem and improve your website performance. So let us go through a set of techniques, best practices, and also some hacks that will help us improve web performance metrics. We will also provide some bonus tips at the end.
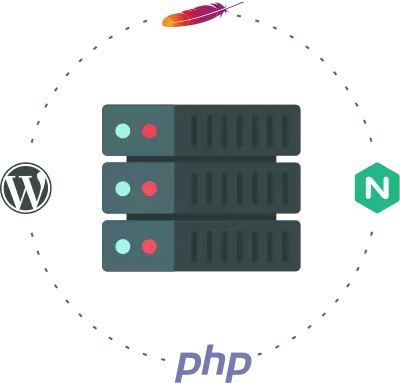
Backend Performance
Improvement to WordPress performance starts with focusing on server performance because that is where most of the WordPress magic happens.
With that said, let us dive deeper.
Choose a Good hosting provider
Running your WordPress website in an efficient server or multiple efficient servers with load balancing is very crucial because you do not want to frustrate your visitors with a broken website. Isn’t it?
If you are running an enterprise-level application we definitely recommend using cloud hosting with load-balanced docker containers to run your site. We guarantee you, this will help you increase the performance to a great extent when compared to the traditional direct VM installations. We have an amazing post coming up soon on how to architect large scale WordPress applications.
But what if you are looking at a smaller audience? Let us cover that too! We have options like Shared hosting, VPS, and dedicated hosting.
In Shared hosting, as the name suggests the server resources are shared between other accounts. With VPS you are guaranteed to get the minimum allocated resources in a shared environment. Finally, with a dedicated server, resources are dedicated to your account. Check out the detailed comparison table by WPRocket for more details on the difference between hosting types.
While choosing the best hosting providers for your website the main features we need to focus on are:
- HTTP/2, SSL
- Pricing
- Performance
- Uptime
- Support
There are a lot of good hosting providers in the market. But researching and choosing the best one can be really time-consuming. So we purchased from the top 7 providers compared them in great detail. Here are the best 3:
- Siteground
- Hostinger
- Bluehost
Use a CDN
CDN stands for Content Delivery Network. It is a distributed network of servers designed to load your website as quickly as possible. By distributing the assets of your websites such as images, javascript and CSS files, etc closer to the visitor, CDN greatly enhances the performance of your website.
Since CDN servers are distributed across the globe, it also helps reduce the initial server response.
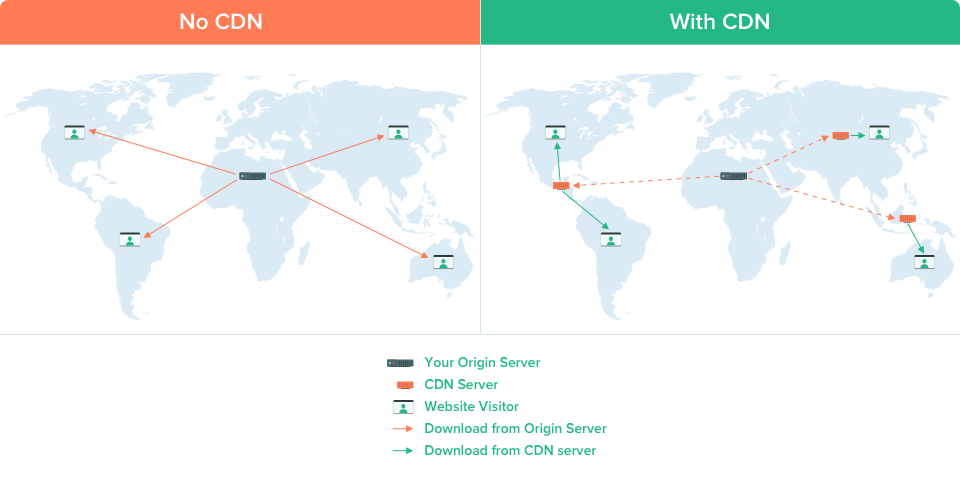
This is a must-use technique and the easiest one. Even if your hosting servers are slow, if you use a CDN, chances are your visitors will never notice that slowness because they always get the saved content from the CDN servers.
There are many CDN providers. But the one which stands out is Cloudflare. It’s free, easy to set up, and works well with most WordPress setups.
Now the great benefit of using Cloudflare is that apart from CDN service, it also comes with a host of other features. A few of them are listed below:
- Free SSL certificate
- Web Firewall
- Traffic Analytics
- DNS Management
- Brotli compression
- Browser caching
- Javascript Workers
- and so much more…
There is really no reason to NOT use Cloudflare for your regular websites. Again, if you are running a large website in AWS or similar cloud hosting, we also recommend checking their in-house CDN services like Cloudfront.
Now it is time to move to the next performance technique.
Choose performant Theme
Well, everyone wants their theme to be loaded with features. But keep in mind, this flexibility should not come at the cost of performance. A well-architected theme should usually fulfill the following parameters:
- Includes PHP files only when necessary
- Keeps a low network request count – for styles, scripts, icons, etc
- Makes minimal database requests
- Follows WordPress Coding standards
- Maintains compatibility with latest WordPress versions
- While maintaining all the above, still provides good customization options.
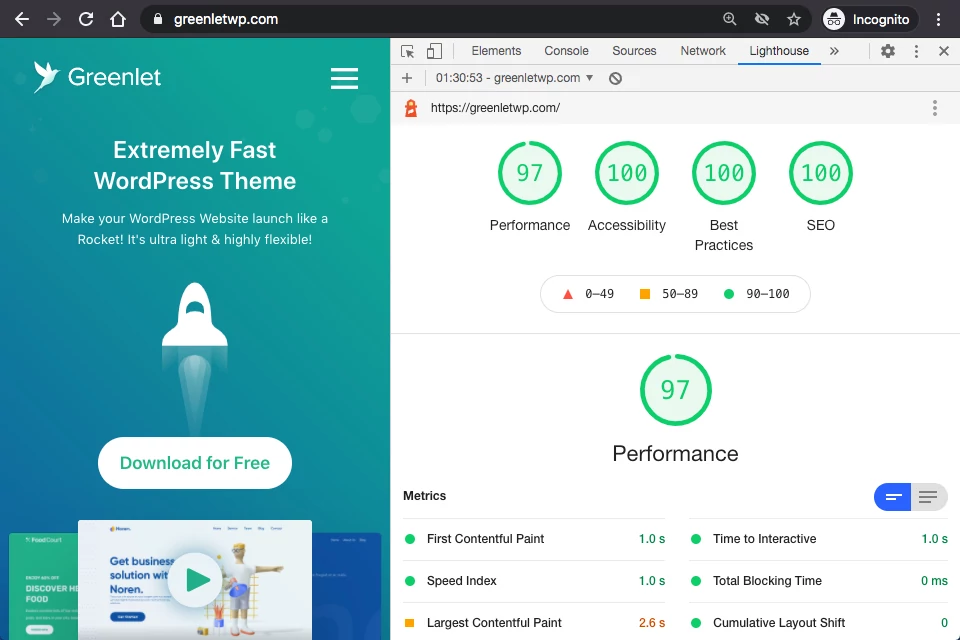
Greenlet theme is one of the fastest performing themes which satisfies all the above while providing insane flexibility with design. Generatepress is another good theme that is lightweight and neat looking with simple customization options.
There may be a few more themes out there that are lightweight and performance-oriented but do your research before installing them. We even suggest consulting an experienced developer for installing themes and plugins. Avoid themes that load unnecessary CSS frameworks, Javascript libraries, font icons, images, etc at any cost.
Install Plugins Wisely
Well, The same principles apply to plugins as well. A plugin should enhance the functionality of your website but not at the cost of taking it down.
Before installing any plugin, conduct research that properly evaluates that plugin and available alternatives. Check if the plugin contains a lot of functionalities you really don’t need. Check for the extra scripts and styles it adds. Check if it generates any PHP warnings or errors. Finally, if you are a developer or hired one, even check how well the code is written and how expensive the database queries are.
We can’t stress this highly enough, but the intent here is to avoid you suffer when it is too late to step back.
Another thing to note: You may not really need caching plugins if you use CDNs, However, adding them may definitely help various aspects of performance. Assess them and install if necessary.
With that said, it is time to look at some caching techniques…
Use Server caching
Caching is the process of storing the output generated from a computed process in temporary storage, so that stored value can be served for future request to increase the speed.
WordPress runs on PHP which is an interpreted language. That means the interpreter compiles your PHP code (WordPress core, plugins, and themes) into HTML code each time your visitor makes a request to your server. This time-consuming operation can be eliminated by saving and reusing chunks of computed content or the generated HTML content somewhere. This is what server-level caching does.
In a WordPress server context, we can incorporate multiple layers of caching. They are:
- Database cache
- PHP cache
- Apache / Nginx cache
- CDN cache
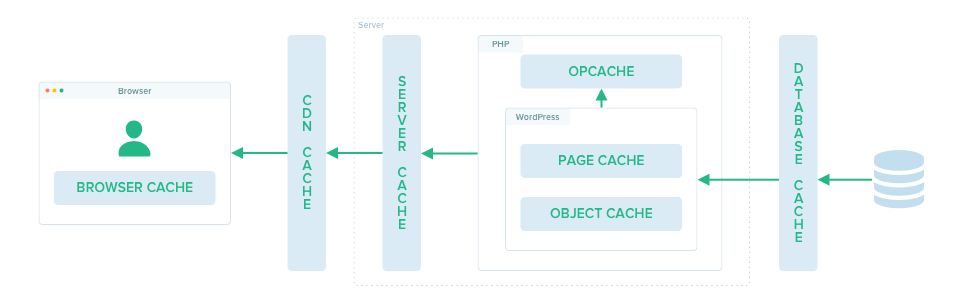
Database cache
Database caching is a method of caching the outputs of non-altering MySQL queries inside memory storage like Memcache or Redis. By reusing the stored query results, we can reduce heavy MySQL operations.
PHP cache
There are different methods of caching within PHP. The first one is the usage Object Caching class from WordPress. The object cache is WordPress’s way of caching data which may be computationally expensive to regenerate. WordPress internally uses transient caching or uses various caching mechanisms like in-memory databases like Redis or Memcache if defined via a plugin. WP_Object_Cache page explains the usage in great depth. A simple example goes like this:
$result = wp_cache_get( 'key' );
if ( false === $result ) {
    $result = compute_heavy_operation();

    wp_cache_set( 'key', $result );
}

// Use $result
The second PHP caching mechanism is OPCache. When enabled, OPCache will store precompiled bytecode in the shared memory. This removes the need for PHP to load and parse your WordPress files on each request thereby improves the response speed.
Enabling OPCache is as simple as editing the following code to your php.ini file and restarting the server.
opcache.enable = 1Follow this guide for detailed explanation.
Another caching mechanism under PHP is Page Caching. This is a method of storing the entire HTML page generated by WordPress in the file system or memory. Usually, page caching internally uses Object caching to store the generated HTML. Popular plugins to achieve this include WP Super Cache, batcache, etc.
Apache / Nginx cache
Besides PHP cache, we can also utilize web servers like Apache or Nginx to handle caching. Check out these great articles on Apache caching and Nginx caching.
We covered the caching strategy on our own servers. Now let’s focus on the caching mechanism in our CDN.
CDN Cache
To optimize the length of this blog post we will take an example of Cloudflare as a CDN provider. It’s pretty much similar with other providers.
There is no real step to take here. CDN caches your content in their edge servers by default. The main factor to consider here is setting an effective caching policy. We can control how long the content is cached. Longer the cache time, the better. However, there may be some pages and/or assets on your website which may require regular updates. These parts need to have a lesser cache expiry time. Finding a good balance is the key.
WP Cloudflare Super Page Cache is an amazing plugin that lets you control various caching parameters right within your WordPress dashboard.
We have come a long way. We covered most of the optimizations in the server. However, there are a few more which we will combine and check-in frontend performance section.
Use latest PHP, Apache / Nginx
PHP 8, Apache 2.4.46, and Nginx 1.18 are the latest stable versions. Why do you need to install or update to the latest versions? That is because usually the latest versions are fully supported by the developers and receive regular security fixes. Also, the latest versions are usually the highest performing versions. Take a look at the PHP version vs speed comparison table.
Keep an eye on your database
What do we mean by keep an eye? We simply mean that don’t clutter your database with unnecessary data. Well, how do we ensure that? Unfortunately there is no magic wand that can help here. Luckily if you follow all the below points we can guarantee that you will end up with cleaner database. So here we go:
- Use Plugins and Themes, that make minimal database requests
- Use plugins that use proper WordPress Object caching for performing repeated queries
- Use plugins that properly clean up the database table and rows it created after uninstalling
- Keep minimal post revisions (number of previous version copies) with which you are comfortable
That’s a lot of server-level enhancements. Wait… There is much more to do to optimize for the frontend that your users experience.
Grab a cup of coffee. Take a deep breath. Let’s continue with WordPress Frontend performance optimization techniques now.
WordPress Frontend Performance
All the backend performance techniques make sure that the server sends the content quickly to the browser.
Now, increasing the performance of your WordPress website within a browser is of paramount importance. That is where a user experiences your website.

Choose a fast loading theme
You may think – Didn’t we cover this already? well, partially yes. However, while choosing a theme you also need to consider how does a theme affects the delivery of content to the browser. Now lesser is the size is not always better. The theme should strike a balance between smaller HTML size and better structure. This includes better structure for users, design as well as for SEO.
Use browser caching
As we covered earlier, caching allows us to reuse a stored component. When it comes to browsers, caching is a mechanism used by browsers to download the assets like images, stylesheets, scripts, etc once and reuse them in subsequent requests until the defined expiry time.
Whether to enable cache or not, Caching expiry time, etc are defined by your server and instructed to the browser at the page load time via HTTP headers.
So to enable browser caching, add the caching headers in your HTTP response. With apache, this can be achieved by adding the following code to the .htaccess
<IfModule mod_expires.c>
	ExpiresActive On
	ExpiresByType image/jpeg "access plus 1 year"
	ExpiresByType image/gif "access plus 1 year"
	ExpiresByType image/png "access plus 1 year"
	ExpiresByType image/webp "access plus 1 year"
	ExpiresByType image/svg+xml "access plus 1 year"
	ExpiresByType image/x-icon "access plus 1 year"
	ExpiresByType text/css "access plus 1 month"
	ExpiresByType text/javascript "access plus 1 month"
	ExpiresByType application/javascript "access plus 1 month"
	# Define expiry for more file types.
</IfModule>
Compress Images
Image compression is a method to reduce the file size of the image usually without a noticeable reduction in the picture quality.
Images and other assets usually take up a lot of bandwidth in a page request. This in turn affects the page load speed. Hence it is of paramount importance that you compress images if you use a lot of them in a single page.
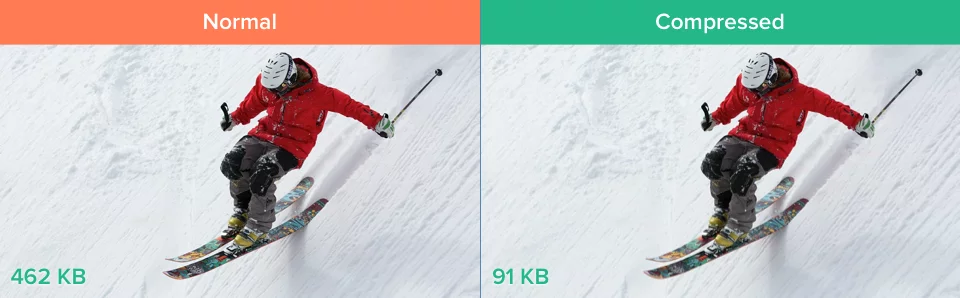
If you use photo editing software like Photoshop or Affinity Photo, these tools may already output compressed images for you. However, if that’s not what you do, check this very effective free online tool: imagecompressor.com
One more online compressor with WebP support: Kid you not, compress-or-die!
We strongly recommend to upload already compressed images to your WordPress backend and avoid installing an optimization plugin altogether. But if you do not wish to spend that extra time, Smush is a good plugin that handles this job. Smush also enables lazy-loading which we will cover later in this guide.
Use proper image sizes
The first concept to understand: If you want to render an image with 100% width and your user’s device is 1000 pixels wide, you do not want to send an image that is 2000 pixels in width.
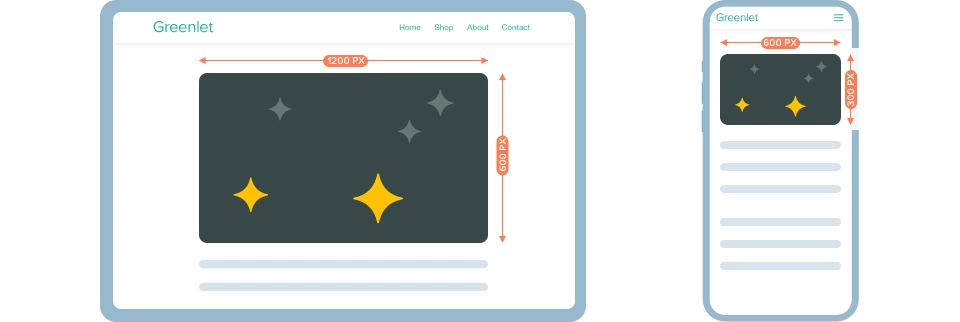
Secondly, Different devices have different viewport sizes. So, sending a single image to the browser is not efficient as well. Fortunately, modern browsers come with a solution to this problem.
With srcset attribute you can define multiple variations of a single image targeted to different viewport sizes. Browsers are intelligent to load only the appropriate image required for a particular device. Check out this article.
In any case, you need to explicitly define width and height. Thankfully WordPress handles this for us. But do not use Full-size images unless it is properly sized to fit the screen.
Besides all this, using SVG images is a much better option. SVG stands for Scalable Vector Graphics. SVG elements are a set of instructions to tell the browser how to draw an image. They always render graphics with the highest resolution possible. This eliminates the need to explicitly define the widths and heights for different devices separately.
Lazy load Images, Videos, and iframes

Lazy loading is a method of loading assets only when needed. When it comes to onscreen assets like images, videos, and iframes, the lazy loading technique will load these assets only when they enter the viewport (by scrolling).
Without lazy loading, the browser loads the assets while loading the page. This makes an extra network request which is an addition to page load time that is wasted if the user never sees that asset.
With modern browsers, it is very easy to implement lazy loading. Simply add the following attribute to an image tag or iframe tag.
loading="lazy"Good news is, WordPress’s Gutenberg editor already does this for you!
Lazy loading video is simple as well. Add preload="none" attribute to the video tag. However, this is not effective for an auto-playing video. Web.dev article explains how to achieve video lazy loading in simple steps.
Use next-generation image formats
As mentioned earlier, using SVG images wherever possible is the best way to go. But we understand that it is not possible to replace most of the images with SVG. When a raster image is used, the best bet is to use the latest image formats like JPEG 2000, JPEG XR, and WebP. They provide superior compression and better quality compared to JPEG and PNG formats.
Inline critical CSS and JS
The general rule of thumb for adding CSS and Javascript is to add CSS in the header and JS in the footer. But it is not always correct. The browser does not need to load all the styles for a page in the header. The only styles that need to be loaded in the header are the ones that affect the initial viewport. The remaining styles can be deferred.
This brings us to the concept of critical CSS. Critical CSS is the set of styles that are needed to style the “above-the-fold” content. Above-the-fold content is the content that the user sees in the browser viewport as soon the page renders.
So, the idea is to separate your styles into 2 parts. First part for the main viewport knows as critical CSS, and second part is for rest of the content.
There are a few online Critical CSS generator tools that you can use and insert the CSS generated to your pages. You can use the WP Add Custom CSS plugin to add custom CSS.
Now, if you are using the Greenlet theme this feature is available directly within the customizer with granular control. You can add Critical CSS for all the pages, per template, per post type, or per specific page.
Defer the remaining styles
Once you add the critical CSS, defer the remaining CSS. Easiest method goes like this:
<link rel="stylesheet" href="remaining-styles.css" media="none" onload="this.media="all">
<noscript><link rel="stylesheet" href="remaining-styles.css"></noscript>
The technique is simple. Add the stylesheet but do not load them ( media=none) so that browsers won’t make a network request or block the rendering of content. Once the page is loaded (onload) change the media to all, so the browser will load that stylesheet and apply it to the rest of the page.
Minify and compress
While we are talking about styles and scripts. let us also check the minification technique.
In simple terms, CSS minification is the process of removing unwanted spaces, indentations and comments from a CSS text. Similarly, Javascript minification is the process of removal of unwanted code from Javascript text including renaming of function names and variables to shorter versions.
Ultimately, minified versions are the smallest possible text versions of a Stylesheet or Javascript.

Now, compression is a technique used to reduce the size of an asset using a computer algorithm. It is an important technique to improve the performance of a WordPress website. This is because, in addition to CSS and Scripts, you can also compress other file types like HTML, XML, plain text, JSON, fonts, and SVG.
Browsers already has decompression mechanisms built in so that when we send a compressed file to the browser it will decompress and read the file appropriately.
Gzip and Brotli are 2 main compression methods. Apache or Nginx servers include built-in modules to handle the compression. For apache, you can add the following code snippet to .htaccess
<IfModule mod_deflate.c>
	AddOutputFilterByType DEFLATE image/svg+xml
	AddOutputFilterByType DEFLATE text/css
	AddOutputFilterByType DEFLATE text/html
	AddOutputFilterByType DEFLATE text/javascript
	AddOutputFilterByType DEFLATE text/plain
	# more file types ...
</IfModule>
Check out this detailed article by Kinsta to enable gzip compression. You can also use caching plugins like WP super cache to enable compression.
Hold on.. before you install a plugin, remember we talked about Cloudflare earlier? With Cloudflare, enabling compression is as easy as toggling a button. That’s why we love Cloudflare so much and highly recommend using them!
With that said, it is time to optimize some plugins now.
Reduce HTTP requests
When a webpage contains a number of assets like scripts, styles, and images, the browser needs to make individual requests to the server and render the content once it receives it. Each additional request is an overhead and impacts the page load speed considerably.
So, loading only the assets required by the page is very important to give the best user experience to your site visitors.
Remove unused Javascript and CSS
In WordPress, it is very easy to install tens of plugins to achieve the desired functionality. But we hardly notice a lot of them add so many unnecessary CSS and JS files to the page. There is no easy way to avoid this though. The best thing you can do is to install only what is really necessary.
Let us look at our WooCommerce example once again. If you are running an eCommerce website, chances are you may want to design a custom landing page with a banner, some products to showcase, customer reviews, etc. You may also want to design custom styles for this page. While achieving this goal, you may never want to include any of WooCommerce default styles.
However, WooCommerce loads 5 different CSS files and 7 JS files for the home page. That is insane. Your customer needs to download 12 scripts to their browser for no reason! This definitely results in a negative user experience and/or Search Engine penalty.
The idea to solve this problem is to inspect these unwanted assets and dequeue them in your child theme or a custom plugin. Example code goes like this:
function gl_dequeue_scripts() {
	if ( is_front_page() ) {
		wp_dequeue_style( 'woocommerce-general' );
		// dequeue all other WooCommerce styles and scripts.
	}
}

add_action( 'wp_enqueue_scripts', 'gl_dequeue_scripts', 99 );
Removing unwanted scripts takes quite a bit of effort. But it is worth it if you are running a fairly large website.
Another example is, if you are using a page builder, dequeue WP Block editor styles. If you are using block editor and page builder plugin is installed, dequeue page builder styles and scripts. If you are writing a simple blog post. consider using the classic editor and do not load other assets at all!
Inline assets with small size
Another method to reduce HTTP requests is to inline the assets like CSS, JS, images, SVG, etc. If your assets are small it is worth inlining these assets. Even smaller images that load above-the-fold should be inlined with base64 encoding. Example <img src="data:image/png;base64,...">
Use System fonts
Now, we are not suggesting you to not get creative and not load external fonts like Google fonts at all. But if you are selecting a network loaded font just because the theme or a plugin has that option, it is time to reconsider.
Adding a single Google font may add 3 additional requests to your site visitor. Weigh that against the value your design brings. If it is worth it, go ahead and include the font. Remember to add preconnect attribute. Else, system font gives your site a neat look most of the time.
If you are loading external fonts, defer loading the font stylesheet as explained earlier and add font-display: swap; CSS rule to make sure that the fonts are not render-blocking your main content. The downside is that the user will notice the fallback font for a short amount of time. Anyway, normally loading the font in the head section without any performance optimization should be the last option.
Check this article by Smashing Magazine for a few more font optimization techniques.
Avoid excessive DOM size
A web page’s DOM size is considered excessive when it has a large number of HTML elements and/or deeply nested elements and/or a large number of child elements per parent element.
A poorly written theme or plugin can cause this issue. A complex inline SVG element, improper usage of Page builders, etc are a few more examples.
To eliminate excessive DOM size, avoid page builders for content that does not need them. If you install a new theme or plugin, evaluate the page content as soon as you install them. If they are adding too many HTML elements for no reason, it is worth reconsidering the usage of the plugin or the theme in question.
Use SVG animations or Videos
SVG animations give us an opportunity to provide a very high-quality graphical representation in motion to the visitors. It is worth investing your time and energy to create SVG animations rather than in gif format. They are always superior in quality.
If SVG animations are not your cup of tea, video format should be used in place of gif formats. Video format provides much better compression and quality to their gif counterparts.
The only situation to use gif is when you need to render animation with transparent pixels over a complex background since video formats supported by major browsers do not support alpha channels yet!
These were most of our tips and tricks to enhance your WordPress website frontend performance. Now it is time for the bonus tips we promised earlier.
Bonus performance tips
Add error logging
Error handling in PHP is expensive even when error logging is off. So fixing the warnings and errors are important to improve your PHP performance. Now fixing them is not just for performance reasons, but also to actually make sure that your website is running as intended.
Multiple redirections, buggy functionality caused by PHP warnings, not found errors, server errors, etc also frustrates the end user. So fix them anyway!
The best way to handle this is to properly test and fix your website’s issues in development environments.
To tackle this, you can safely turn on the error logging by turning off the error display and logging them to a file that is completely inaccessible to the public. Add following code to wp-config.php
define( 'WP_DEBUG_LOG', true );
define( 'WP_DEBUG_DISPLAY', false );
@ini_set( 'display_errors', 0 );
This will tell WordPress to save the error log to the file wp-content/debug.log. Ensure that this file is not readable by the public. If it is not done, it is a security risk since anyone can read your application and server information. Command to remove access to the public:
chmod 600 wp-content/debug.logNote that some hosting providers change the error log locations to /error_log, /logs/error.txt, etc. Consider this accordingly.
Involve your developers early
If you are working with a developer, involve them early. They might call out potential performance concerns. If you are a developer consider performance from day one in every step of the website development process. That way, make everyone’s life easier when the day comes to measure the performance.
That’s how you improve the performance of a WordPress website. Before we wrap up, it’s your turn to let us know which of these methods are easy to implement? Do you have more tips/suggestions/methods to improve a website’s performance? Drop a quick comment below and we are excited to discuss!